…on the Android Headunit? and where to connect the BACK wire to?
REV, reverse, back up, and BACK. They are often labeled on the pink wire. But what is this pink wire for, what to connect it to, or do you need to connect the pink rev or the back wire for the Android head unit to work?
Universal Fit
The universal fit Android headunits, like any of our universal fit Androids reviewed here, have universal wiring connectors. Unlike the custom-fit Android headunits with factory-style connectors, ISO plugs are supplied with the universals for connecting to an older vehicle directly or to a manufacturer-specific adaptor cable.
Universal ISO system
The ISO system deployed by the universal fit Android headunits gives high flexibility and reduces the need to cut and join wires. This is true for the main speaker and power connections, which can be plug-and-play.
Then there is the reversing camera.
One of the main selling points for an Android headunit is the reversing camera feature. A rear-mounted camera and a feed of that video signal to the Android headunit will help when backing up a vehicle.
The Android headunit switches automatically to the camera view from its Android screen when reverse gear is selected. The Android headunit knows when to switch by monitoring the reversing light signal. This is what the pick wire on an Android headunit is used for.
REV for REVERSE
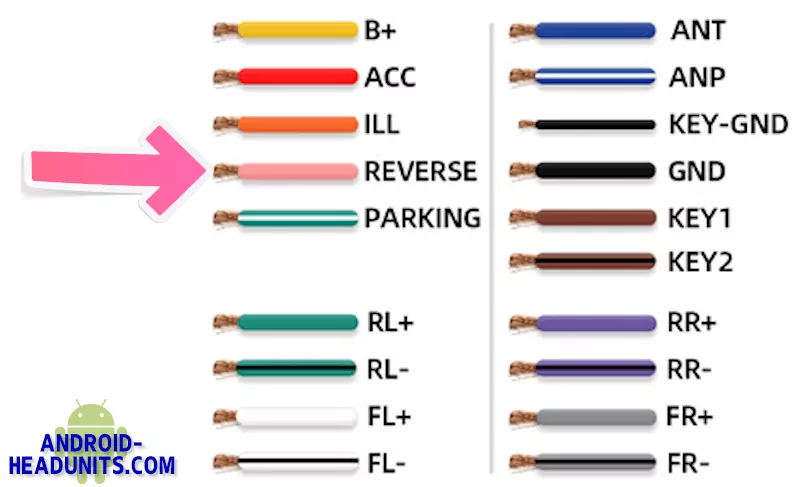
REV is short for ‘reverse,’ and the Reverse indicates the gear selection for traveling backward or just backing up. REV can be a pink wire on an Android headunit, but not always. The color for REV is not standard, so that it could be any color wire. The important thing is that it is either marked REV, reverse, or the color in the installation guide is identified as REV.
BACK is for Backing-up
Back and Reverse are the same wire, just with a different name. Back up a car is also to reverse the vehicle so the wording can be used interchangeably during translation. See REV? It also means BACK.
What to connect the REV wire to?
Android Headunit Tip
Connect the pink (REV or BACK) wire to any wire that goes live when reverse gear is selected to enable the backup camera feature
Android Headunit Tip
Connect the pink (REV or BACK) wire to any wire that goes live when reverse gear is selected to enable the backup camera feature
Reverse Gear
The vehicle’s rear white warning lights are illuminated when the reverse gear is selected. The rear light cluster at the reversing lamp is the obvious place to connect REV. This position couldn’t be any further away from the headunit, so it doesn’t sound ideal. But, the camera video cable will also run from the rear of the vehicle, and the camera power supply can also be taken from the same place as the pink wire. So pick up power to the backup camera at the rear cluster, reverse lamp, and connect the pink wire to this point.
Backup Camera
You will run the reversing camera video cable from the vehicle’s rear to behind the dashboard. It connects to your Android headunit at this point. Also, run the Pink ‘backup’ feed simultaneously with the camera feed. Some camera cables have an integrated power lead, so follow the instructions supplied with the reversing camera. We also have a guide to connecting the pink wire, the reversing camera wiring, and a diagram for your Android headunit here.
Finding the reverse signal
If you can’t access the wiring diagram for your vehicle, use a 12v meter and test to earth each cable in the rear cluster with a helper in the driver’s seat to select Reverse. You would expect around +12v with Reverse selected and 0v when it isn’t selected. Don’t forget you may need the engine running or at least the ignition on to find the signal wire. You can see what is required by watching the reversing lights. You may need to start the engine if they don’t come on when the Reverse is selected.
CAN bus error – lamp out error
Problems can appear with CAN-enabled vehicles and the lighting circuit, and if you get a false message indicating the reversing lamp is faulty, you will need to fit a CAN bus bypass relay.
Joying
Joying may use ORANGE for the REV/BACK wire to confuse the issue, so try to translate the labels and use the wire colors as a guide.


